Serverless?
Over a couple of last years, serverless architecture has gotten more and more popular. Developers and companies are shifting their approach to create, maintain and deploy their web applications. But what is exactly serverless? As the guys from https://serverless-stack.com/ defined it:
Serverless computing (or serverless for short), is an execution model where the cloud provider (AWS, Azure, or Google Cloud) is responsible for executing a piece of code by dynamically allocating the resources. And only charging for the amount of resources used to run the code. The code is typically run inside stateless containers that can be triggered by a variety of events including http requests, database events, queuing services, monitoring alerts, file uploads, scheduled events (cron jobs), etc. The code that is sent to the cloud provider for execution is usually in the form of a function. Hence serverless is sometimes referred to as Functions as a Service or FaaS.
TIP: Check out their tutorial - it's really awesome and will help you to understand what's what in serverless world.
What you will build?
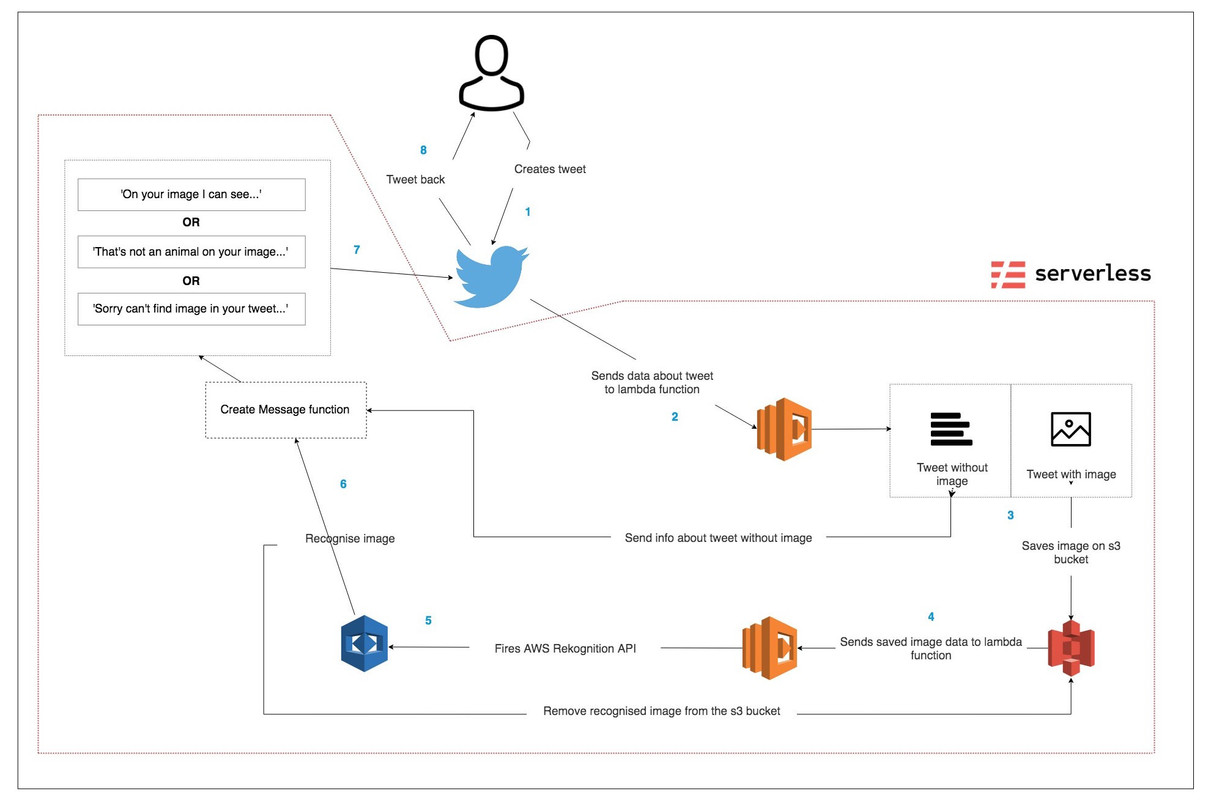
In this tutorial, I will show you how to build a Twitter Bot that will receive a tweet with an attached image, recognize what's on that image (if it's an animal) and respond with the correct response. For example, if you'll tweet an image of a giraffe, the bot will use our serverless architecture and almost immediately respond to you with something like this - "Hey, on your image I can see a giraffe!". To achieve this we will use the Serverless Framework. It's a fantastic tool that allows you to easily configure all the cloud services, that you need for your project, in one configuration file. Apart from that, it's provider agnostic so you don't have to choose between AWS, Azure or Google Cloud, you can use all of them. In this example, you'll use Amazon Web Services - AWS. It has dozens of great cloud services, but you will use only a few - S3 bucket, Lambda Functions, API Gateway and Image Rekognition. Check out this fancy flowchart to see how it's all going to work together.
First things first
Before you can start using Serverless Framework, you'll need to make sure that you have basic Twitter API configuration in place. First of all, create a developer Twitter account and add a new app on https://developer.twitter.com. When you're done, go to permissions section and make sure you change it to 'Read, write, and direct messages'. In keys and access tokens section, make sure you generate an access token and access token secret. You'll need them later to communicate with API. To enable data sending to your webhook, you'll need to get access to Account Activity API. Apply for it here. It says that it's a Premium tier, but we only need the sandbox option (which is free) for our purpose. Now, when you successfully applied for API access, on your developer account, go to Dev Environments and create an environment for Account Activity API. Make note of Dev environment label, because you'll need it later.
Register Twitter webhook
Now, the way Account Activity API works might look a little confusing at first, but it's actually pretty straightforward. Here are the steps required to make it work:
- Send post request to Twitter API with information about URL endpoint, that will handle Twitter Challenge Response Check
- Twitter API sends GET request to fulfil Twitter Challenge Response Check
- Your endpoint responds with a properly formatted JSON response - Webhook is registered (yay!).
- Send POST request to Twitter API to subscribe your application to your Twitter app.
To handle all these requests, we will create a Twitter Controller Class. First of all, let's create all properties that we'll need to use in our methods:
const request = require('request-promise');

module.exports = class TwitterController {
  constructor(
    consumerKey,
    consumerSecret,
    token,
    tokenSecret,
    urlBase,
    environment,
    crcUrl
  ) {
    this.consumerKey = consumerKey;
    this.consumerSecret = consumerSecret;
    this.token = token;
    this.tokenSecret = tokenSecret;
    this.urlBase = urlBase;
    this.environment = environment;
    this.crcUrl = crcUrl;
    this.credentials = {
      consumer_key: this.consumerKey,
      consumer_secret: this.consumerSecret,
      token: this.token,
      token_secret: this.tokenSecret,
    };

    this.registerWebhook = this.registerWebhook.bind(this);
  }
};
All properties that we're going to pass in a constructor, will be stored in a serverless.env.yml file in the project root directory. I'll get back to that later.
Now, let's take a look at methods that will handle communication with Twitter API.
  setRequestOptions(type, webhhokId) {
    let url = null;
    let content = {};
    const { urlBase, environment, credentials, crcUrl } = this;

    switch (type) {
      case ('registerWebhook'):
        url = `${urlBase}${environment}/webhooks.json`;
        content = {
          form: {
            url: crcUrl,
          },
        };
        break;
      case ('getWebhook'):
        url = `${urlBase}${environment}/webhooks.json`;
        break;
      case ('deleteWebhook'):
        url = `${urlBase}${environment}/webhooks/${webhhokId}.json`;
        break;
      case ('registerSubscription'):
        url = `${urlBase}${environment}/subscriptions.json`;
        break;
      case ('createTweet'):
        url = `${urlBase}update.json`;
        break;
      default:
        url = `${urlBase}${environment}/webhooks.json`;
    }
    return Object.assign({}, {
      url,
      oauth: credentials,
      headers: {
        'Content-type': 'application/x-www-form-urlencoded',
      },
      resolveWithFullResponse: true,
    }, content);
  }

  async registerWebhook() {
    const requestOptions = this.setRequestOptions('registerWebhook');

    try {
      const response = await request.post(requestOptions);
      console.log(response);
      console.log('Succesfully register webhook');
    } catch (err) {
      console.log(err);
      console.log('Cannot register webhook');
    }
  }

  async registerSubscription() {
    const requestOptions = this.setRequestOptions('registerSubscription');

    try {
      const response = await request.post(requestOptions);
      if (response.statusCode === 204) {
        console.log('Subscription added. Yay!');
      }
    } catch (err) {
      console.log(err);
      console.log('Cannot register subscription');
    }
  }

  async createTweet(status, tweetID) {
    const requestOptions = Object.assign({}, this.setRequestOptions('createTweet'), {
      form: {
        status,
        in_reply_to_status_id: tweetID,
        auto_populate_reply_metadata: true,
      },
    });

    try {
      await request.post(requestOptions);
    } catch (err) {
      console.log(err);
      console.log('Cannot post tweet.');
    }
  }
Most of the methods are async functions that will create some kind of request. For sending the request we're using request-promise library. Let's explain them shortly:
- setRequestOptions - creates object with parameters we need to pass to request methods, like endpoint URL, credentials and optional content
- registerWebhook - sends POST request to Twitter API, with Twitter Challenge Response Check URL as a content
- registerSubscription - sends POST request to Twitter API, to register subscription to our webhook
- createTweet - sends POST request to Twitter and create new Tweet
The Serverless
To start working with Serverless we need to install it (duh!). Open your terminal and install the framework globally.
$ npm install serverless -g
After that, navigate to your project folder and run :
$ serverless create --template aws-nodejs
This command will create a default node.js + AWS configuration file. The yaml file that was generated contain lots of commented code. We won't need it here, so go on and remove it. The only things we care about now is this:
service: aws-nodejs
provider:
  name: aws
  runtime: nodejs8.10
functions:
  hello:
    handler: handler.hello
This is minimal, basic configuration. Now, before we go any further you'll need to create an AWS account (if you don't have one already), and setup your AWS credentials for Serverless. I won't get into details of that process, you can see how to do it here.
After setting up the credentials, you could just start adding configuration details. But there's one more thing I want to mention. Normally, Serverless will default your profile name and AWS region you're using, but if you have multiple profiles on your machine (private, work etc.), it's a good practice to define it in serverless.yaml file like that:
provider:
  name: aws
  runtime: nodejs8.10
  profile: aws-private # your profile name
  region: eu-west-1 # aws region
TIP: In your command line you can use a shortcut - instead of 'serverles …' you can simply type 'sls …'. Pretty neat.
ENV file
Like I've mentioned before, for storing our keys, tokens and other variables, we will create serverless.env.yml file in the root folder. It should look like that:
TWITTER_CONSUMER_KEY: ########
TWITTER_CONSUMER_SECRET: ########
TWITTER_TOKEN: ########
TWITTER_TOKEN_SECRET: ########
ENVIRONMENT: ########
URL_BASE: 'https://api.twitter.com/1.1/account_activity/all/'
URL_CREATE: 'https://api.twitter.com/1.1/statuses/'
CRC_URL: ########
First five of them, we've mentioned before, while creating App in Twitter Dev Account. There's also an URL base in here, just to keep all variables in one file. We will create Twitter Challenge Response Check URL later on, with Serverless Framework and AWS.
With env file in place, you can inject variables into your code, by placing them in serverless.yml file. We can do it like that:
custom:
  CRC_URL: ${file(./serverless.env.yml):CRC_URL}
  ENVIRONMENT: ${file(./serverless.env.yml):ENVIRONMENT}
  TWITTER_CONSUMER_KEY: ${file(./serverless.env.yml):TWITTER_CONSUMER_KEY}
  TWITTER_CONSUMER_SECRET: ${file(./serverless.env.yml):TWITTER_CONSUMER_SECRET}
  TWITTER_TOKEN: ${file(./serverless.env.yml):TWITTER_TOKEN}
  TWITTER_TOKEN_SECRET: ${file(./serverless.env.yml):TWITTER_TOKEN_SECRET}
  URL_BASE: ${file(./serverless.env.yml):URL_BASE}
provider:
  name: aws
  runtime: nodejs8.10
  profile: aws-private
  region: eu-west-1
  environment:
    TWITTER_CONSUMER_KEY: ${self:custom.TWITTER_CONSUMER_KEY}
    TWITTER_CONSUMER_SECRET: ${self:custom.TWITTER_CONSUMER_SECRET}
    TWITTER_TOKEN: ${self:custom.TWITTER_TOKEN}
    TWITTER_TOKEN_SECRET: ${self:custom.TWITTER_TOKEN_SECRET}
    ENVIRONMENT: ${self:custom.ENVIRONMENT}
    CRC_URL: ${self:custom.CRC_URL}
    URL_BASE: ${self:custom.URL_BASE}
By adding variables as environment object in provider, we're able to access them in any function that we're going to define in a serverless configuration file. We could also pass it separately in each function, but I'll show that example later in the tutorial.
Functions
Now, let's get to the main part of our project - lambda functions. Let's start with defining first of them in our config file.
functions:
handleCrc:
    handler: src/lambda_functions/handleCrc.handler
    events:
      - http:
          path: twitter/webhook/handleapi
          method: get
So, what happened here is, we create the first lambda function called handleCrc. Body of the function is going to live in the handler method. In the events section, you define when that function meant to be invoked. As you can see, after sending GET request to our endpoint - twitter/webhook/handleapi, handleCrc function is going to run. That's the basic way of creating lambda functions configuration in the Serverless Framework. There are multiple options to define events, like for example - image has been uploaded to S3 Bucket, new data has been added to database etc.
Let's see how your function actually looks like, and what is it doing.
const crypto = require('crypto');

const encodeCrc = (crcToken, consumerSecret) =>
  crypto.createHmac('sha256', consumerSecret).update(crcToken).digest('base64');

module.exports.handler = async (event) => {
  const responseToken = encodeCrc(
    event.queryStringParameters.crc_token,
    process.env.TWITTER_CONSUMER_SECRET
  );
  return {
    statusCode: 200,
    body: JSON.stringify({ response_token: `sha256=${responseToken}` }),
  };
};
You're going to use Crypto library to encode response from Twitter API. As you can see it's pretty straightforward. You need to pass Twitter Challenge Response Check token, and your Twitter Consumer Secret to encodeCRC function and return the result. Notice that we're getting our secret from process.env object. We can access it like that thanks to previously defining it in serverless.yml file.
Now you can deploy your serverless build to obtain the Twitter Challenge Response Check URL that we're going to need later on.
To deploy our function, simply run serverless command from our project directory:
$ sls deploy
That will create new AWS CloudFormation template, and upload your functions into S3 bucket. If everything went fine, you should see something like this:
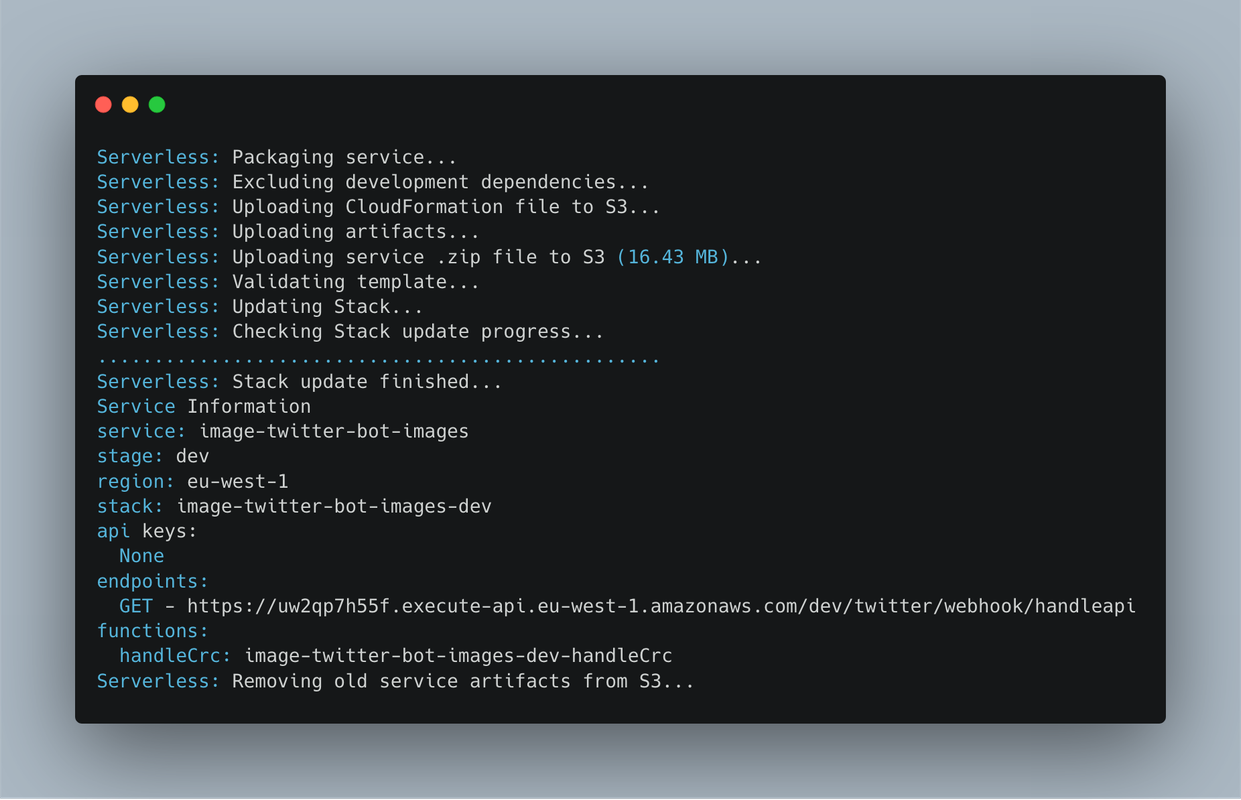
Here you can find all info about your stack: stage, stack name, endpoints, uploaded functions etc. The endpoint is the thing that you should care about right now. Like I've mentioned before, you're going to need that URL address to pass Twitter Challenge Response Check. Copy and paste it into your serverless.env.yml file.
TIP: If you are interested to learn what is actually happening behind the scenes when $ sls deploy command is run, you can go here and read all about it.
Register webhook and subscription
Now, let's add lambda functions that are going to be responsible for registering webhook and user subscription. You're going to follow the same pattern for defining functions in the config file.
functions:
...
registerWebhook:
    handler: src/lambda_functions/registerWebhook.handler
    events:
      - http:
          path: twitter/webhook/register
          method: get
  registerSubscription:
    handler: src/lambda_functions/registerSubscription.handler
    events:
      - http:
          path: twitter/subscription/register
          method: get
Actual bodies of these functions are really straightforward. Basically, you invoke an appropriate method from TwitterController class, that we've created earlier.
const TwitterController = require('../TwitterController');

module.exports.handler = async () => {
  const controller = new TwitterController(
    process.env.TWITTER_CONSUMER_KEY,
    process.env.TWITTER_CONSUMER_SECRET,
    process.env.TWITTER_TOKEN,
    process.env.TWITTER_TOKEN_SECRET,
    process.env.URL_BASE,
    process.env.ENVIRONMENT,
    process.env.CRC_URL
  );

  await controller.registerSubscription();
};
const TwitterController = require('../TwitterController');

module.exports.handler = async () => {
  const controller = new TwitterController(
    process.env.TWITTER_CONSUMER_KEY,
    process.env.TWITTER_CONSUMER_SECRET,
    process.env.TWITTER_TOKEN,
    process.env.TWITTER_TOKEN_SECRET,
    process.env.URL_BASE,
    process.env.ENVIRONMENT,
    process.env.CRC_URL
  );

  await controller.registerWebhook();
};
Certainly no magic in here. You create a new instance of a class, pass all the credentials, and run the functions. That's it. Let's redeploy our application with:
$ sls deploy
You should see a 'report' (similar to the one we've received after the first deploy), with your endpoints URLs. Now you've got everything to actually register your webhook.
You can literally just paste the endpoints into the browser's address bar. Let's do it with registerWebhook first. But before we do that, let's see how we can actually monitor our functions.
$ sls logs -f registerWebhook
If you run that in your terminal, you'll get a logs report of the last invocation of your function. You can optionally tail the logs and keep listening for new logs by passing this option:
$ sls logs -f registerWebhook -t
NOTE: That will work only if your functions have been invoked at least once before.
Now you can go to your registerWebhook endpoint URL in the browser. After that, go to terminal and run logs. If you everything is fine, you should see a message:
Successfully register webhook
Repeat the same steps for registerSubscription function. Great! You just registered your twitter webhook.
Handle Twitter responses
Since now, any activity on your twitter account will trigger a POST request with all the data about that activity. To see the data, you have to create a lambda function that will handle that request.
/* serverless.yml */
functions:
...
handleTweet:
    handler: src/lambda_functions/handleTweet.handler
    events:
      - http:
          path: twitter/webhook/handleapi
          method: post
module.exports = (username, labels = []) => {
  let message = '';
  const ANIMAL_LABELS = [
    'Animal',
    'Mammal',
    'Bird',
    'Fish',
    'Reptile',
    'Amphibian',
  ];
  const isAnimal =
    labels.length && labels.some((label) => ANIMAL_LABELS.includes(label.Name));

  if (labels.length === 0) {
    message = `Sorry @${username}, you need to upload an image.`;
  } else if (isAnimal) {
    const recongizedLabels = labels.map((label) => label.Name);
    message = `Hi @${username}. On your image, I can recognize: ${recongizedLabels.join(
      ', '
    )}.`;
  } else {
    message = `Ooops @${username} looks like it's not an animal on your image.`;
  }

  return message;
};
const uploadImage = require('../helpers/uploadImage');
const createMessage = require('../helpers/createMessage');
const TwitterController = require('../TwitterController');

module.exports.handler = async (event) => {
  const tweet = JSON.parse(event.body);
  const tweetData = await tweet.tweet_create_events;

  if (typeof tweetData === 'undefined' || tweetData.length < 1) {
    return console.log('Not a new tweet event');
  }

  if (tweet.for_user_id === tweetData[0].user.id_str) {
    return console.log('Same user, not sending response.');
  }

  const { id_str, user, entities } = tweetData[0];
  const key = `${id_str}___---${user.screen_name}`;

  // If tweet containes image
  if (entities.hasOwnProperty('media')) {
    const imageUrl = tweetData[0].entities.media[0].media_url_https;
    await uploadImage(imageUrl, {
      bucket: process.env.BUCKET,
      key,
    });
  } else {
    const controller = new TwitterController(
      process.env.TWITTER_CONSUMER_KEY,
      process.env.TWITTER_CONSUMER_SECRET,
      process.env.TWITTER_TOKEN,
      process.env.TWITTER_TOKEN_SECRET,
      process.env.URL_CREATE,
      process.env.ENVIRONMENT,
      process.env.CRC_URL
    );
    const message = createMessage(user.screen_name);
    await controller.createTweet(message, key);
  }
};
const fetch = require('node-fetch');
const AWS = require('aws-sdk');

const s3 = new AWS.S3();

module.exports = async (image, meta) => {
  console.log('Uploading image....');

  const mediaResponse = await fetch(image);
  const bufferedMedia = await mediaResponse.buffer();
  const params = {
    Bucket: meta.bucket,
    Key: meta.key,
    Body: bufferedMedia,
  };

  try {
    const uploadedImage = await s3.putObject(params).promise();
    console.log(uploadedImage, 'Image uploaded.');
  } catch (err) {
    console.log(err);
    console.log('Cannot upload.');
  }
};
Let's analyse that and see what is actually happening here:
In handleTweet.js file:
- checking event object if it's actually a tweet (might be a private message or something else), and if the tweet is coming from another user (we don't want to create an infinite loop when sending a reply)
- checking tweet for the media element, if it has one, you're going to upload an image to S3 bucket, if not - send back tweet with information about missing image
NOTE: At line 18 we're creating a filename from variables - tweet ID and user name and some dashes/underscores. We're doing it like that to easily get these variables in later part.
In uploadImage.js file:
- install node-fetch with npm and use it to download image saved on Twitter's servers
- change fetched imaged to binary data with buffer method and pass it as a body in parameters
- install aws-sdk package to use AWS services methods directly in code
- upload the image to an s3 bucket with an s3.putObject method
TIP: You can return a promise, instead of using a callback, from most of the aws-sdk request by running promise() on them. See more here.
Handle image upload to S3
Now, you want to set up a lambda function that will fire, every time a new image is uploaded to our bucket. To do it we need to add some config to servereless.yml
/* serverless.yml */
functions:
...
respondToTweetWithImage:
    handler: src/lambda_functions/respondToTweetWithImage.handler
    events:
      - s3:
          bucket: ${self:custom.BUCKET}
Let's take a look at respondToTweetWithImage function.
const AWS = require('aws-sdk');

module.exports = async (meta) => {
  const rekognition = new AWS.Rekognition();
  const params = {
    Image: {
      S3Object: {
        Bucket: meta.bucket.name,
        Name: meta.object.key,
      },
    },
    MaxLabels: 5,
    MinConfidence: 85,
  };

  try {
    const data = await rekognition.detectLabels(params).promise();
    return data.Labels;
  } catch (err) {
    console.log(err);
    console.log('Cannot recognize image');
  }
};
const AWS = require('aws-sdk');

module.exports = (meta) => {
  const s3 = new AWS.S3();
  const params = {
    Bucket: meta.bucket.name,
    Key: meta.object.key,
  };

  try {
    s3.deleteObject(params).promise();
  } catch (err) {
    console.log(err);
    console.log('Cannot delete image.');
  }
};
const recognizeImage = require('../helpers/recognizeImage');
const removeImage = require('../helpers/removeImage');
const createMessage = require('../helpers/createMessage');
const TwitterController = require('../TwitterController');

module.exports.handler = async (event) => {
  const { s3 } = event.Records[0];
  const tweetId = s3.object.key.split('___---')[0];
  const username = s3.object.key.split('___---')[1];

  const labels = await recognizeImage(s3);
  const message = createMessage(username, labels);
  const controller = new TwitterController(
    process.env.TWITTER_CONSUMER_KEY,
    process.env.TWITTER_CONSUMER_SECRET,
    process.env.TWITTER_TOKEN,
    process.env.TWITTER_TOKEN_SECRET,
    process.env.URL_CREATE,
    process.env.ENVIRONMENT,
    process.env.CRC_URL
  );
  await controller.createTweet(message, tweetId);
  removeImage(s3);
};
Let's analyse that and see what is actually happening:
- when an image is uploaded to s3 bucket, the function will receive an object with all the data about the event
- thanks to the specific construct of image filename, we can get the original tweet id and user name who posted it
- after that, the function will pass data about the event to AWS Rekognition Class
- it then recognizes what's on the image and returns it to createMessage function
- the created message is posted to Twitter as a response
- image is removed from s3 bucket, as it's not needed anymore
Conclusion
And that's it. You've managed to create a Twitter Bot that will automatically recognize the image, and respond with a correct message, accordingly to posted picture. I encourage you to play even more with the functionality - recognize different type of images, create more specific messages etc. This example was just a brief overview of serverless, and how you can build stuff with it without almost zero backend knowledge.
If you have any comments or think something might be wrong, please send me a message or leave a comment.