Introduction
For one of the last project at work, I had to create a section based navigation. The one that will highlight the correct navigation item when you scroll to the particular section of the page. After doing some reading and research I figured I could use Intersection Observer API. A really great, browser-native API that will fire up an event every time the desired element will show up in the viewport. You can read more about it here.
Today I want to show you what I’ve learned from that project. In this tutorial, we’ll build a mini page that will contain a description of different kind of Ricks from various dimensions(?). Check the working demo and github repo.
That is almost the exact copy of the project I’ve created at work (as much as I would want to, I’m not creating Rick and Morty websites). Anyway, let’s get to it.
Let’s get it started
Boilerplate
First of all, we’ll start by creating our project scaffold. We’ll use Create React App. If you ever used it before, I don’t have to explain the pros of it. If you haven’t quickly fix that mistake and go check the project website. Run this in your terminal:
    $ npx create-react-app rick-morty-section-navigation
    $ cd rick-morty-section-navigation
    $ npm start
Boom, there we go — working boilerplate. Let clean up some default stuff that we won’t need here. Remove and move around some files so your project structure looks like this.
    rick-morty-section-navigation
    ├── README.md
    ├── node_modules
    ├── package.json
    ├── .gitignore
    ├── public
    │   ├── favicon.ico
    │   ├── index.html
    │   └── manifest.json
    └── src
        ├── index.js
        └── components
            ├── App.js
            └── app.css
Don’t forget to remove references to removed files (index.css, serviceWorker.js, etc).
Data
As for the data layer, I decided to use Rick and Morty API (because why not?). Check it out here — it’s totally free and got lots of information about my favorite TV show. As a bonus, there’s a GraphQL endpoint, which we going to use instead of a classic REST API.
Go on and install urql, graphql and graphql-tag. Urql is a really great GraphQL client for React apps, which you can use as a component or hook (so hot right now).
$ npm install --save urql graphql
Now let’s wrap our App component in urql provider. It’s really straightforward, create a client with API URL and pass it to the provider.
// src/index.js
import React from 'react';
import ReactDOM from 'react-dom';
import App from './components/App';
import { Provider, createClient } from 'urql';

const client = createClient({
  url: 'https://rickandmortyapi.com/graphql/',
});

ReactDOM.render(
  <Provider value={client}>
    <App />
  </Provider>,
  document.getElementById('root')
);
Now you can start querying data from the endpoint.
// src/compoments/App.js
import React from 'react';
import { useQuery } from 'urql';
import gql from 'graphql-tag';

const getCharacters = gql`
  query AllCharacters {
    characters(filter: { name: "rick" }) {
      info {
        count
      }
      results {
        id
        name
        image
        species
        status
        location {
          name
        }
        origin {
          dimension
        }
      }
    }
  }
`;

export default function App() {
  const [res] = useQuery({
    query: getCharacters,
  });
  if (res.fetching || typeof res.data === 'undefined') {
    return <div>Loading page...</div>;
  } else {
    return (
      <div>
        {res.data.characters.results.map((item) => {
          return (
            <>
              <div>
                <img src={data.image} />
              </div>
              <div className="character-block__text">
                <h2>{data.name}</h2>
                <p>
                  <b>Status</b>: {data.status}
                </p>
                <p>
                  <b>Location</b>: {data.location ? data.location.name : '-'}
                </p>
                <p>
                  <b>Species</b>: {data.species}
                </p>
                <p>
                  <b>Dimension</b>: {data.origin.dimension || '-'}
                </p>
              </div>
            </>
          );
        })}
      </div>
    );
  }
}
Let’s see what’s happening here:
we create a simple query to the API
in our App component, we’re using
useQueryto actually fetch the data from the APIif URQL is still fetching the data, we’re returning loading component,
if URQL has fetched the data, we’re looping through results and return list of character blocks
Structure
We have few unstyled divs with some simple data, but that’s obviously not enough. Before we add some styling and create two main components — Navigation, Character, let’s think about the state. In order to make it work, we need an active/current character state in the top component.
    // src/compoments/App.js

    *import* React, {useState} *from* 'react';
    ...
    ...
    const [activeCharacter, setActiveCharacter] = useState();
Now we can pass the state, and method that will update the state to child components.
// src/components/Navigation.js
import React from 'react';
export function Navigation({items, activeCharacter}) {
function renderItems() {
return items.map((item) => {
const activeClass = activeCharacter === item.name
? 'navigation-list__item--active'
: '';
return (
<li
key={item.name}
id={item.name}
className={`navigation-list__item ${activeClass}`}>{item.name}</li>
);
});
}
return (
<ul className="navigation-list">{renderItems()}</ul>
);
}
// src/components/Character
import React from 'react';
export function Character({
data,
activeCharacter,
setActiveCharacter,
}) {
const activeClass = activeCharacter === data.name
? 'character-block--active'
: '';
return (
<div
className={`character-block ${activeClass}`}
id={data.name}>
<div>
<img src={data.image} alt="" className="character-block__image"/>
</div>
<div className="character-block__text">
<h2>{data.name}</h2>
<p><b>Status</b>: {data.status}</p>
<p><b>Location</b>: {data.location ? data.location.name : '-'}</p>
<p><b>Species</b>: {data.species}</p>
<p><b>Dimension</b>: {data.origin.dimension || '-'}</p>
</div>
</div>
);
}
// src/components/App.js
...
import {Navigation} from './Navigation';
import {Character} from './Character';
export default function App() {
...
if (res.fetching || typeof res.data === 'undefined') {
return (
<div>Loading...</div>
);
} else {
const characters = res.data.characters.results.slice(0, 9);
return (
<>
<div className="page-wrapper">
<aside className="sidebar">
<Navigation
items={characters}
activeCharacter={activeCharacter}/>
</aside>
<div className="content">
<div className="page-intro">
<h1 className="page-title">Check out these cool Morty's!</h1>
<p>This simple page is an example of using Intersection Observer API with React.
</p>
</div>
{
characters.map((item) => {
return (
<Character
key={item.name}
activeCharacter={activeCharacter}
data={item}
setActiveCharacter={setActiveCharacter}/>
);
})
}
</div>
</div>
</>
);
}
Also, let’s add some basic styles (don’t forget to import them in app.js):
/* Mobile styles */
* {
  box-sizing: border-box;
}
body {
  color: #282c34;
  font-family: 'Roboto Mono', monospace;
  padding: 0;
  margin: 0;
  width: 100%;
  position: relative;
  overflow-x: hidden;
}
.page-title {
  margin-bottom: 2rem;
}
.page-intro {
  max-width: 700px;
  margin-bottom: 3rem;
}
.page-wrapper {
  padding: 20px 15px 20px;
  width: 100%;
  max-width: 1300px;
  display: flex;
}
.sidebar {
  display: none;
}
.character-block {
  display: flex;
  margin-bottom: 2rem;
  transition: 0.3s;
  flex-direction: column;
}
.character-block--active {
  background: #faf575;
}
.character-block__image {
  width: 100%;
}
.character-block__text {
  padding: 1rem;
}

/* Tablet landscape styles */
@media screen and (min-width: 768px) {
  .page-wrapper {
    padding-bottom: 120px;
  }
  .sidebar {
    display: flex;
    flex: 1;
  }
  .content {
    flex: 2.1;
  }
  .character-block {
    flex-direction: row;
  }
  .character-block__image {
    margin-right: 2rem;
    display: flex;
    align-self: center;
  }
  .character-block__text {
    padding: 0 1rem;
    align-self: center;
  }

  .navigation-list {
    position: fixed;
    top: 50%;
    transform: translate3d(0, -50%, 0);
    left: -10px;
    list-style: none;
  }
  .navigation-list__item {
    font-size: 0.9rem;
    max-width: 200px;
    margin-bottom: 0.5em;
    transition: 0.3s;
    cursor: pointer;
  }
  .navigation-list__item:hover {
    padding-left: 5px;
    background: #faf575;
  }
  .navigation-list__item--active {
    background: #faf575;
    padding-left: 15px;
  }
}

/* Tablet vertical styles */
@media screen and (min-width: 1024px) {
  .sidebar {
    min-width: 250px;
  }
  .content {
    flex: 2.5;
  }
}
/* Desktop styles */
@media screen and (min-width: 1140px) {
  .sidebar {
    min-width: 250px;
  }
  .character-block {
    margin-bottom: 5rem;
  }
  .character-block__image {
    margin-right: 2rem;
  }
  .character-block__text {
    align-self: center;
  }
}
So far, so good. If you followed the instructions you should get something similar to this:
Nothing cool about it, just a bunch of Ricks. To make it more interactive, we need to add Intersection Observer, to detect which Rick-section is currently in the middle and make it the active one.
Intersection Observer API
What exactly is Intersection Observer API? It allows observing the intersection of an element with viewport or ancestor element. We could use it to determine if, for example, target visible to the user. What is really great about that API is it’s not causing reflow/layout trashing which is a very common performance issue (check this out for reference).
If you want to learn more about Intersection Observer, I encourage you to read the MDN documentation.
The code
We’ve covered the theory, now let’s get to the actual code. We want to add an observer to each Character component to detect if it’s intersecting with the viewport.
    // src/components/Character.js

    import React, {useEffect, useRef} from 'react';

    import React from 'react';

    export function Character({
      data,
      activeCharacter,
      setActiveCharacter,
    }) {
      const activeClass = activeCharacter === data.name
        ? 'character-block--active'
        : '';
     const characterRef = useRef(null);

    useEffect(() => {
        const handleIntersection = function(entries) {
          entries.forEach((entry) => {
            if (entry.target.id !== activeCharacter && entry.isIntersecting) {
              setActiveCharacter(entry.target.id);
            }
          });
        };
        const observer = new IntersectionObserver(handleIntersection);
        observer.observe(characterRef);
        return () => observer.disconnect(); // Clenaup the observer if
        component unmount.
      }, [activeCharacter, setActiveCharacter, data, characterRef]);

    return (
        <div
          className={`character-block ${activeClass}`}
          id={data.name}
          ref={characterRef}>
          <div>
            <img src={data.image} alt="" className="character-block__image"/>
          </div>
          <div className="character-block__text">
            <h2>{data.name}</h2>
            <p><b>Status</b>: {data.status}</p>
            <p><b>Location</b>: {data.location ? data.location.name : '-'}</p>
            <p><b>Species</b>: {data.species}</p>
            <p><b>Dimension</b>: {data.origin.dimension || '-'}</p>
          </div>
        </div>
      );
    }
Let’s see what happened here:
useEffect hook has been added
handleIntsersection method that will be fired every time the intersection event will occur, has been defined; if entry target is intersecting with the viewport, the function will set its ID as a new activeCharacter and lift the state up to the parent component
new Intersection Observer instance (with handleIntsersection as a callback) has been created
observer method has been invoked, with reference to current character wrapper (useRef hook was used)
Now every time the character component will become visible, it will trigger the observer callback, and set up the new active character. But we don’t want to section to become active, as soon as it reaches the viewport. We’re aiming for the center of the viewport. To achieve that we can pass rootMargin configuration to the observer. This property uses CSS-like syntax and allows us to extend or reduce the area in which element will trigger the callback.
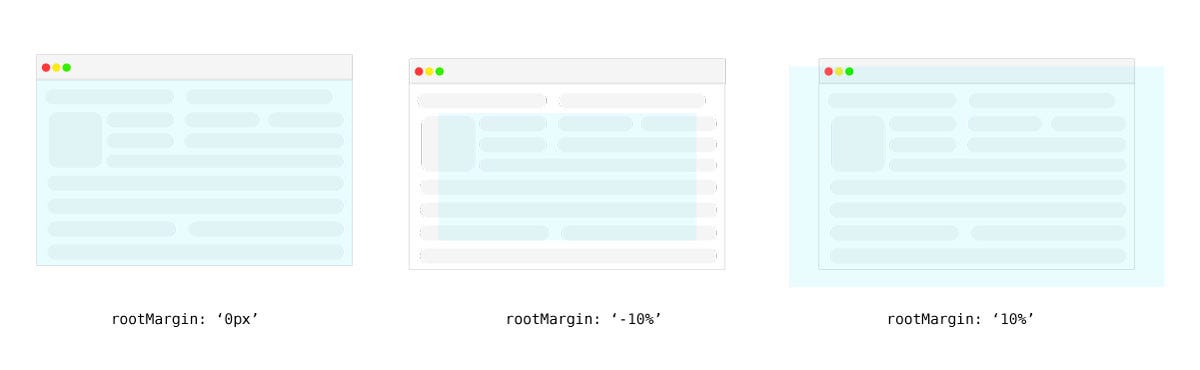
In simple words: when our element will get into this blue area, the event will fire. We want the blue area to have a height of 1px and be placed in the center of the viewport. Let’s add some code then.
    // src/components/App.js

    export default function App() {

    ...

    const [pageHeight, setPageHeight] = useState();

    useEffect(() => {
        setPageHeight(window.innerHeight);
        window.addEventListener('resize', (e) => {
          setTimeout(() => {
            setPageHeight(window.innerHeight);
          }, 300);
        });
      }, []);

    ...

    }
We’re setting the page height as a piece of state in here with useState. Also on window resize, we want to update that state to make sure is up to date. To make it more performant, we wrap it with setTimeout method to debounce the function. Let’s update the Character.js now.
    export function Character({
      data,
      activeCharacter,
      setActiveCharacter,
      pageHeight
    }) {

    ...

    const observerMargin = Math.floor(pageHeight / 2);
    useEffect(() => {

    const observerConfig = {
          rootMargin: `-${pageHeight % 2 === 0 ? observerMargin - 1 :
    observerMargin}px 0px -${observerMargin}px 0px`,
        };
        const handleIntersection = function(entries) {
          entries.forEach((entry) => {
            if (entry.target.id !== activeCharacter && entry.isIntersecting) {
              setActiveCharacter(entry.target.id);
            }
          });
        };
        const observer = new IntersectionObserver(handleIntersection, observ);
        observer.observe(characterRef);
        return () => observer.disconnect(); // Clenaup the observer if
        component unmount.
      }, [activeCharacter, setActiveCharacter, data, characterRef]);

    ...

    }
We’re passing the page height as a props to Character.js component, calculate the correct rootMargin and pass it as a configuration object to new IntersectionObserver.
// pageHeight === 700
rootMargin: '349px 0px 350px 0px';
// pageHeight === 701
rootMargin: '350px 0px 350px 0px';
That way we ensure that the target area will always have 1px height, and will be located in the center. At this point, you should have an almost fully working example. How cool and simple is that, right?

NOTE: To make it work on Internet Explorer browser, install Intersection Observer Polyfill and React App Polyfill.
Clickable links
One last thing we need to add is a clickable link feature. We’re going to use React’s createRef API and native scrollIntoView method.
// src/components/App.js
...
if (res.fetching || typeof res.data === 'undefined') {
return (
<div>Loading...</div>
);
} else {
const characters = res.data.characters.results.slice(0, 9);
const refs = characters.reduce((refsObj, character) => {
refsObj[character.name] = createRef();
return refsObj;
}, {});
const handleCLick = (name) => {
refs[name].current.scrollIntoView({
behavior: 'smooth',
block: 'center',
});
};
return (
<>
<div className="page-wrapper">
<aside className="sidebar">
<Navigation
items={characters}
activeCharacter={activeCharacter}
handleCLick={handleCLick}/>
</aside>
<div className="content">
<div className="page-intro">
<h1 className="page-title">Check out these cool Morty's!</h1>
<p>This simple page is an example of using Intersection Observer API with React.
</p>
</div>
{
characters.map((item) => {
return (
<Character
key={item.name}
activeCharacter={activeCharacter}
data={item}
setActiveCharacter={setActiveCharacter}
refs={refs}/>
);
})
}
</div>
</div>
</>
);
}
// src/components/Navigation.js
import React from 'react';
export function Navigation({items, activeCharacter, handleCLick}) {
function renderItems() {
return items.map((item) => {
const activeClass = activeCharacter === item.id
? 'navigation-list__item--active'
: '';
return (
<li
key={item.name}
id={item.name}
onClick={() => handleCLick(item.name)}
className={`navigation-list__item ${activeClass}`}>{item.name}</li>
);
});
}
return (
<ul className="navigation-list">{renderItems()}</ul>
);
}
// src/components/Character.js
import React, {useEffect} from 'react';
export function Character({
data,
activeCharacter,
setActiveCharacter,
pageHeight = 100,
refs,
}) {
const observerMargin = Math.floor(pageHeight / 2);
const activeClass = activeCharacter === data.id
? 'character-block--active'
: '';
useEffect(() => {
const observerConfig = {
rootMargin: `-${pageHeight % 2 === 0 ? observerMargin - 1 : observerMargin}px 0px -${observerMargin}px 0px`,
};
const handleIntersection = function(entries) {
entries.forEach((entry) => {
if (entry.target.id !== activeCharacter && entry.isIntersecting) {
setActiveCharacter(entry.target.id);
}
});
};
const observer = new IntersectionObserver(
handleIntersection,
observerConfig);
observer.observe(refs[data.name].current);
return () => observer.disconnect(); // Clenaup the observer if
component unmount.
}, [activeCharacter, setActiveCharacter, observerMargin, refs, data, pageHeight]);
return (
<div
className={`character-block ${activeClass}`}
ref={refs[data.name]}
id={data.id}>
<div>
<img src={data.image} alt="" className="character-block__image"/>
</div>
<div className="character-block__text">
<h2>{data.name}</h2>
<p><b>Status</b>: {data.status}</p>
<p><b>Location</b>: {data.location ? data.location.name : '-'}</p>
<p><b>Species</b>: {data.species}</p>
<p><b>Dimension</b>: {data.origin.dimension || '-'}</p>
</div>
</div>
);
}
Let go through that big chunk of code and figure out what just happened:
we’ve created an object with refs for each character and passed it to the Character components, to populate it later with correct elements references
we’ve created a method to handleClick event on navigation links and pass it to Navigation component, and attach it to each link element
in Character.js we’ve removed createRef API, assigned ref to refs object instead and use refs[data.name].current as a target element in the observer
That’s all folks
As you can see, it’s really straightforward to set up Intersection Observer in your React project. Obviously, there are some ready-to-go components with that functionality, which I encourage you to use. I just thought it would be good to show you how the API really works.
I hope you enjoyed this tutorial, and if you’ve got any questions or comments, let me know in the comments section.